This post may contain affiliate links. Read our disclosure policy.


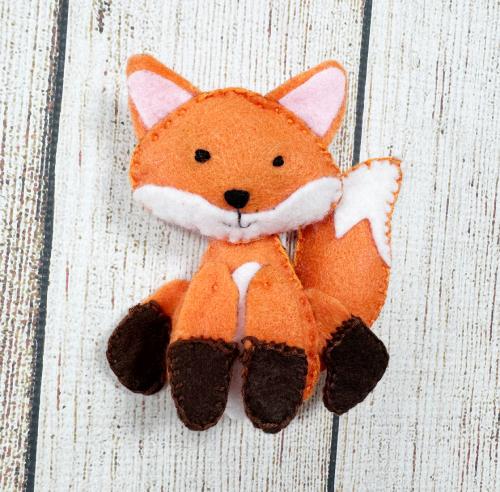
🦊 I’m so excited to help you make this sweet hand-sewn fox plushie! This project is simple enough for kids ages 8+ (with a little adult help) and fun for beginner adults too. You’ll learn a few basic stitches while creating your own cute woodland fox. Add a tiny felt scarf for fall or Christmas, and you’ve got the perfect handmade holiday friend.
Want More Felt Sewing Fun?
Find more beginner-friendly felt sewing projects and step-by-step videos on my YouTube channel, Sly Sew Simple. I post new patterns, easy tips, and fun crafts for kids and grown-ups alike!
» Subscribe & Explore More

What You’ll Need:
- Felt (orange, white, pink and brown work great for a fox)
- Free Fox Pattern (download below)
- Markers (or similar) for tracing
- Embroidery floss (try to match the colors to your felt, and choose an eye and nose color)
- Needle with the big eye / Embroidery Needle
- Scissors
- Stuffing (polyester filler, scrap felt, or even ripped-up plastic grocery bags)
🖨️ Free Printable Felt Fox Pattern – Click to Download and Print
 Click Image to Download and Print
 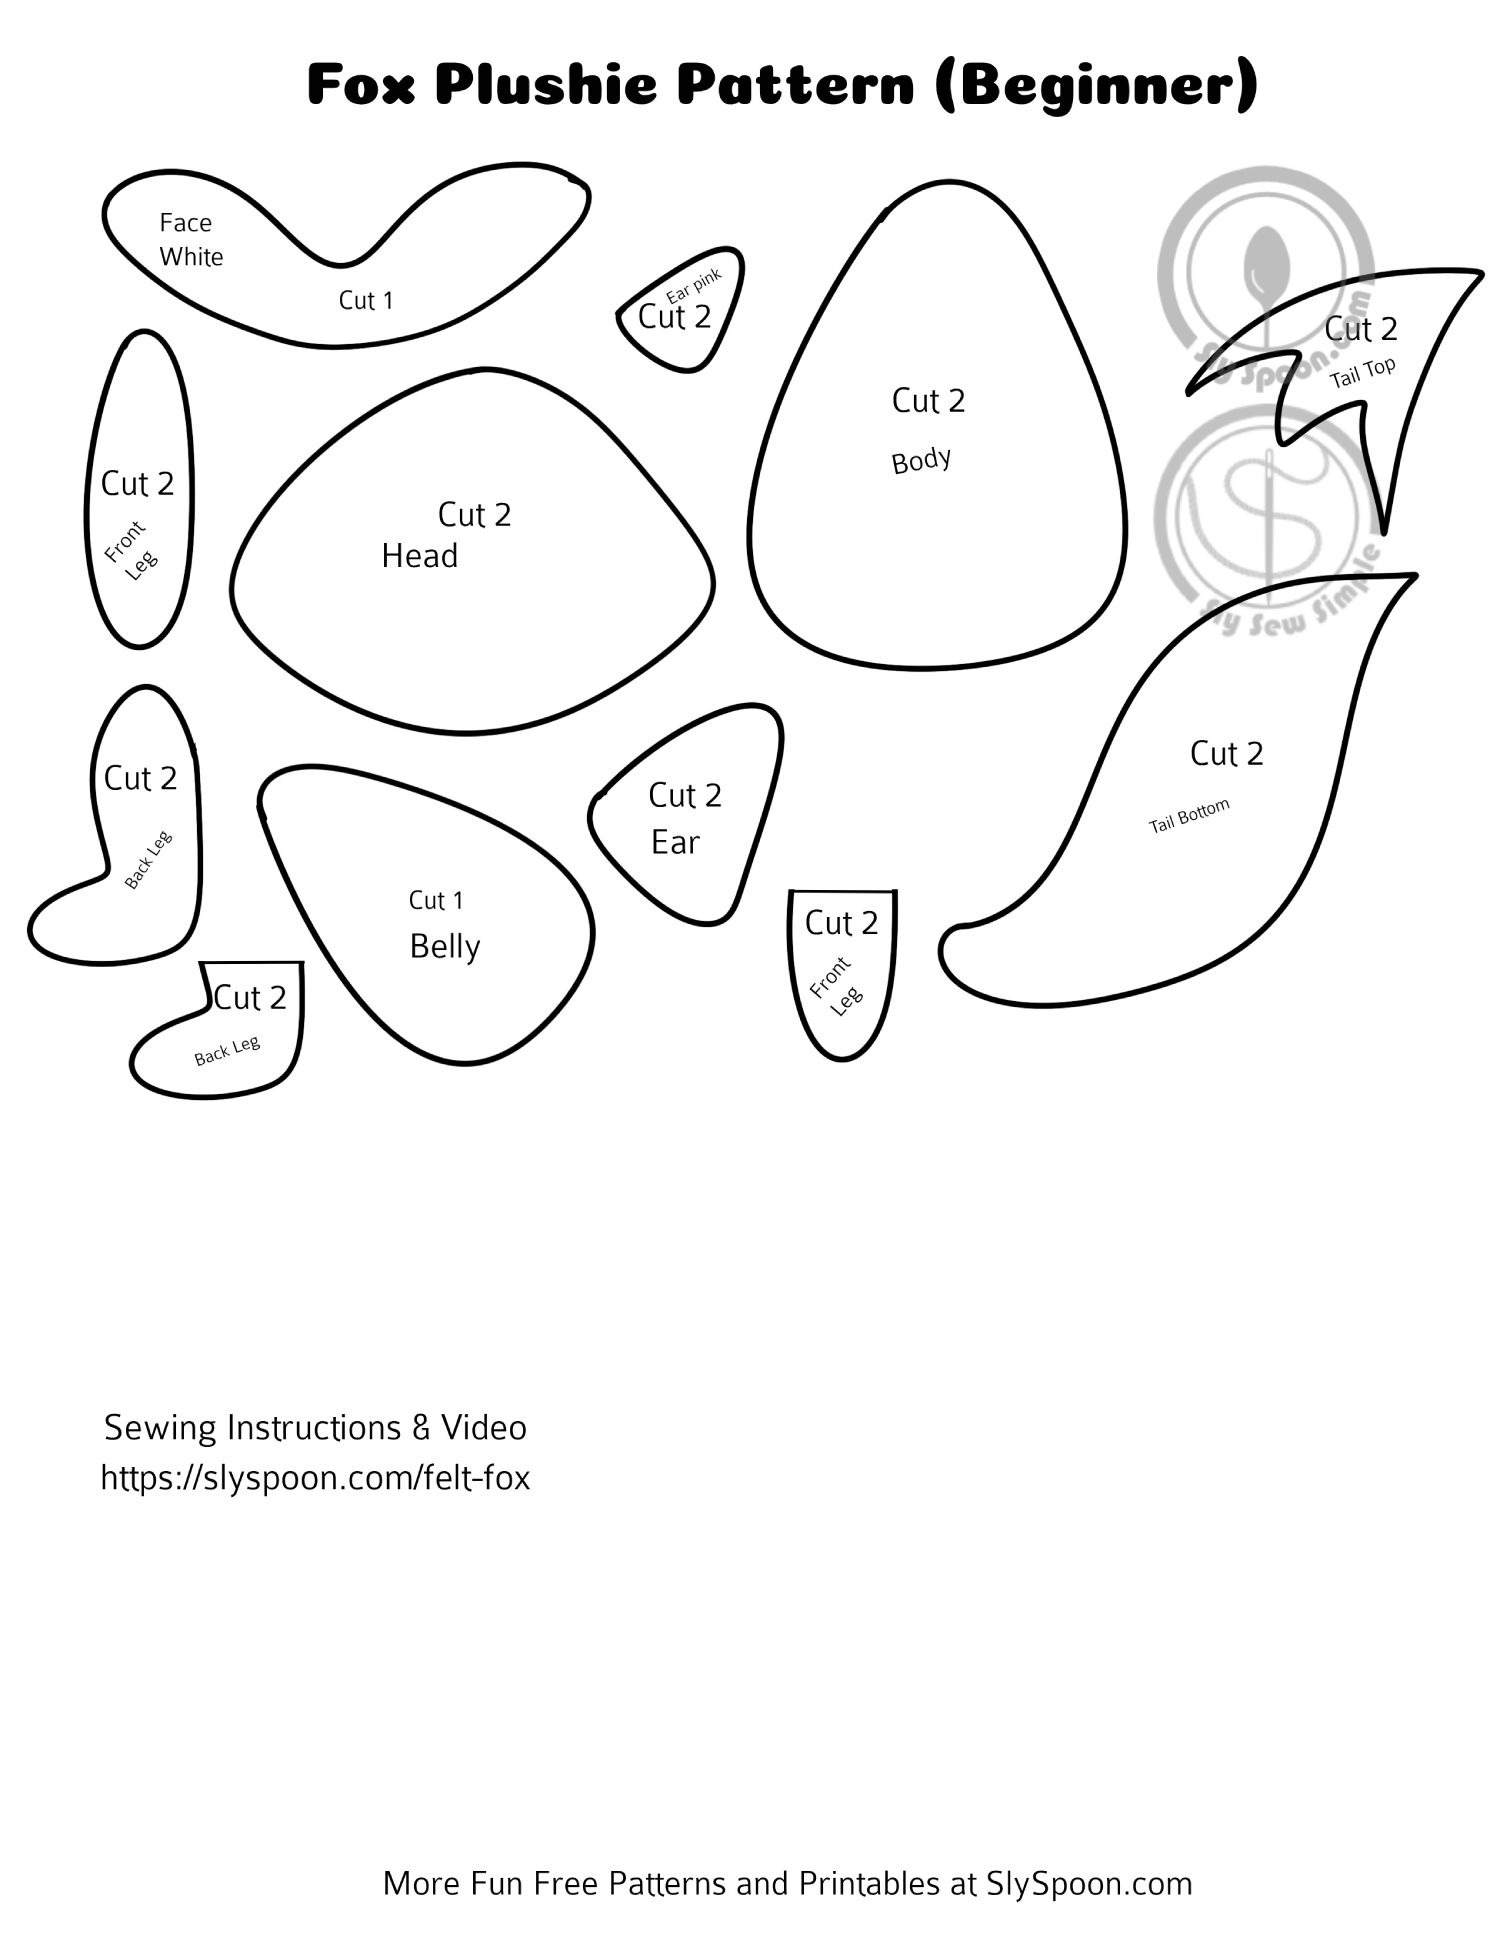 Click Image to Download and Print
Step-by-Step Instructions

Step 1: Cut Out Your Pieces
- Print and cut out the free fox pattern.
- Trace each shape onto your felt, if the pattern needs to be traced twice, trace it on the front and back (side without the words) this will help the pattern pieces line up better while sewing.
- Carefully cut out all your felt pieces, try to cut off any visible tracing lines.
- Save leftover scraps for stuffing.
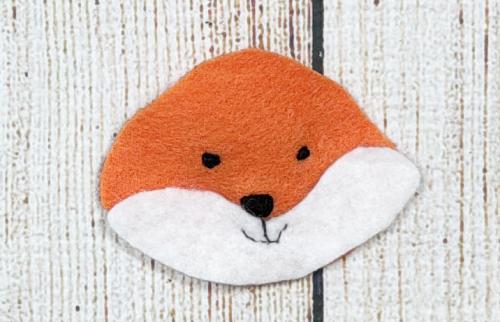
Step 2: Sew or Drawn the Fox’s Face
Option 1 – Draw the Face with Marker
Grab a sharpie and draw on the foxes eyes, nose and mouth. Great if you are a super beginner and want to sew your fox together more quickly, and are less interested in the small face details.
Option 2 – Sew the Face
Great option if you’re excited to try some beginner friendly detailed stitches.
Now it’s time to give your Fox a cute little nose! Place the felt head stripe/cheeks on the lower part of the foxes face. Use embroidery floss and a few stitches to make a small triangle or oval right in the center of the nose pad.
 How to Stitch the Fox’s Nose
- Cut a small piece of embroidery floss (about 18 inches is plenty).
- Thread your needle and tie a knot at the end.
- Push the needle up from the back of the felt where you want one side of the nose to start.
- Make a small stitch by going down across to the other side of where the nose should be.
- Come up again in a new spot and keep stitching back and forth to fill in the shape.
- A triangle or oval shape works best!
- Keep your stitches close together so there are no felt gaps.
- When you’re happy with how it looks, flip your felt over and tie a knot on the back to hold it in place.
 Tip: Go slow and use short stitches—you can always add more to fill it in!
Step 3: Draw or Sew On the Eyes (with Knot Stitches)
Use knot stitches to sew each eye.
How to Knot Stitch
- Thread your needle and tie a knot at the end.
- Push the needle up from the back of the felt where you want the eye to go.
- Pull it all the way through.
- Go back down very close to the same spot to make a small stitch.
- Repeat 2–3 times in the same place to make the eye “pop” and look bigger.
- Tie a knot on the back to hold it in place.
- Repeat for the second eye!
Step 4: Add a Smile! (with Backstitch) *Optional Step*
This step is a little trickier than some of the others, but if you want you can add a mouth to your fox with a backstitch! Sometimes I find it helpful to lightly draw where I want the mouth to be with a pencil so I can trace over it with my thread, but you can also just free hand it without drawing tracing lines.
Starting under the nose, use a backstitch to add a mouth to your fox.
How To Backstitch
- Start by pushing your needle up through the felt from the back.
- Move forward a small bit and push the needle down again.
- Now bring the needle up a little ahead of the last stitch.
- Go backward into the end of the previous stitch.
- Repeat: up ahead, down back into the last stitch—this makes a smooth line!

 Step 5: Sew the Fox’s Head Together (Blanket Stitch & Running Stitch)
Now it’s time to put the two head pieces together. Line up the head pieces and use a blanket stitch starting at the bottom of the fox’s face, and go to the side about where it’s eyeball is. Pause there to add the fox’s ear with a running stitch.
How to Blanket Stitch
- Thread your needle and tie a knot.
- Start at the edge of the felt, push the needle up through one layer, pull it through.
- Go down through both layers a little bit forward.
- Before pulling the stitch tight, slide the needle through the loop of thread.
- Pull gently so it makes a little “hook” along the edge.
- Keep going around the edge of the cat’s head.
- Once you’ve stitched along the side to where you want to add the ear, stop.
Step 6: Add the Fox’s Ear (Running Stitch)
Line up the two pieces of the fox’s ear, with the smaller (in my case pink) piece in front and the bigger (in my case orange) piece in back. Add the two ear pieces between the two head pieces on the fox. Use a running stitch to attach it.
How To Running Stitch
- Push the needle up from the back of the fabric.
- Move forward and push it down again.
- Keep going: up, down, up, down, leaving little spaces between stitches.
- It’ll look like a dashed line. Easy and fast!

Step 7: Finish Sewing the Fox’s Head (Blanket Stitch & Running Stitch)
- Go back to your blanket stitch to sew across the top of the fox’s head.
- Once you’re across the head stripe, add the second ear with a running stitch.
- After the ear is added, continue with a blanket stitch —but leave a small gap for stuffing.
- stuff the head gently, then finish sewing it closed. Tie a knot to finish!

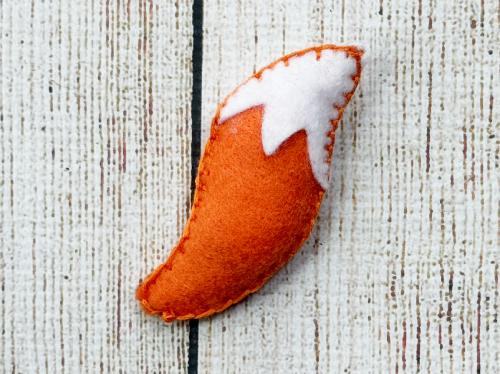
Step 8: Make the Tail
- Take four tail pieces for your fox (2 orange and 2 white).
- Line them up and start with a blanket stitch at the bottom orange part of the tail.
- Continue with the blanket stitch around the white part of the tail, making sure your needle is going through all 4 pieces of felt.
- Keep going until you have a small gap at the bottom, and stuff your fox tail, then finishing sewing it, and knot it off at the end.
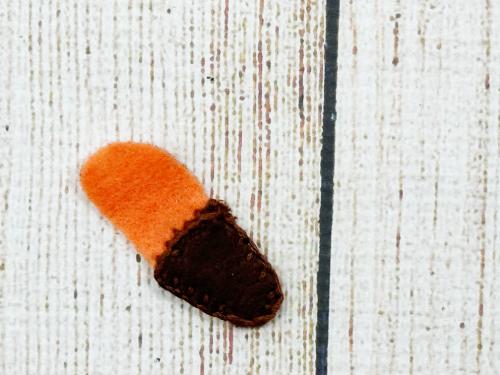
Step 9: Add the Brown Socks to the Legs and Arms
- Position the brown foot pieces on top of the orange arm pieces.
- Sew a the brown pieces to the feet using a blanket stitch or a running stitch.
- Knot off the ends when finished.
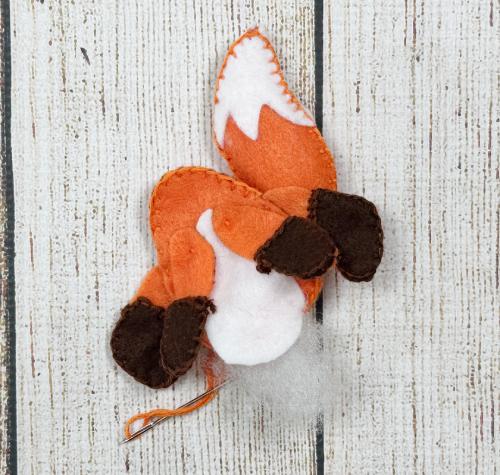
Step 10: Attach the Tail, Belly, Arms and Legs (Knot Stitches)
Take the body pieces of your fox, and decide if you want the round belly to be at the bottom of the fox, or under the fox’s neck. You can sew it in place with a running stitch, or you can layer the fox’s arms over the belly piece, and sew the belly piece in as you add the arms with a simple knot stitch.
- Use knot stitches to attach the arms and legs to the front of the body.
- Use knot stitches again to attach the tail to the back body piece.
Step 11: Sew the Body Together (Blanket Stitch + Stuffing)
- Now it’s time to sew the body front and back together!
- Place the front and back of the body together.
- Use your blanket stitch to go all the way around—leave a space to add stuffing.
- Gently fill the body with stuffing until it’s nice and squishy.
- Finish sewing it closed and knot it off tightly.

Step 12: Connect the Head and Body (Ladder Stitch)
Last step—attach your fox’s head to its body using a ladder stitch.
How to Ladder Stitch
This is a sneaky stitch that hides the thread between the pieces.
- Line up the bottom of the head with the top of the body.
- Push the needle up from inside the head’s bottom edge.
- Go straight across into the body, then come out just a little forward.
- Go back across into the head, and repeat.
- You’ll make a zig-zag that looks like rungs on a ladder.
- Pull gently as you go—it’ll close the gap like magic!
- Tie a final knot to hold everything in place.

Step 13: Add Holiday Touches (Optional)
- Cut a thin strip of felt in red, green, or another color of your choosing.
- Wrap it around your fox’s neck like a scarf. Make small cuts in each end so it looks like fringe.
- Knot loosely or sew a tiny stitch to hold it in place.
🎉 You did it! You’ve made your very own felt fox plushie. Perfect as a beginner sewing project, a woodland friend for fall, or a festive handmade ornament for Christmas.
Why You’ll Love This Project
- Simple, step-by-step instructions for beginners
- Great for kids learning to sew or adults starting out
- Fun woodland animal theme, perfect for fall or holiday crafting
- Makes a wonderful DIY gift, toy, or Christmas ornament